In this tutorial, you will learn how to read the contents of a CSV file and insert that data into a database. The SQL syntax in this example is based on MySQL, but GoAnywhere can perform the same process with SQL Server, Oracle, DB2, and other databases.
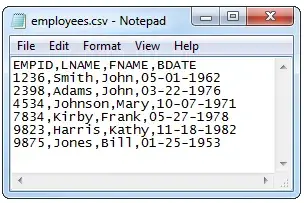
We will start by looking at the contents of the CSV file that we are importing. We can see that column headings are included, each field is delimited by a comma, and the file name is employees.csv which will be referenced in the Project.
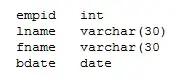
The database table that we will be importing into is defined with 4 columns to match the input file. The first column is the employee ID, defined as an integer, which is the primary key of the table. Then there are the first and last name columns, defined as variable length characters, followed by the birth date field.
Create Project
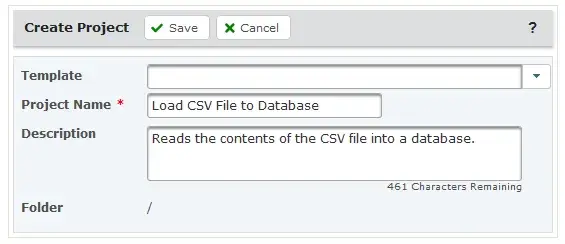
In GoAnywhere MFT, access the Project Explorer by clicking on the Projects item in the Workflows menu. Then create a new Project and provide a name and description.
Import Using GoAnywhere
Not using GoAnywhere MFT yet? Start a free trial and test it out for 30 days.
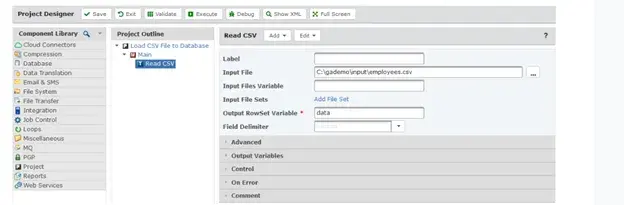
Read CSV
From the Project Designer, drag the Read CSV task from the Component Library to the Project Outline. On the Read CSV task, enter the Input File location. Then specify an Output RowSet Variable name which will be used later to reference the data when inserting into the database. For this example, we will use 'data' as the RowSet variable name.
Since the CSV file we are working with contains column headings, we will need to specify 'true' on the Skip First Row attribute on the Advanced panel to ignore them. By default, the Field Delimiter is set to 'comma' but you can change that setting if the file you are working with is delimited using another character (for example, tab, pipe, colon, etc.). Also, you may need to specify a different Record Delimiter if each record in the file isn't delimited by a Carriage Return Line Feed (CRLF).
Formatting Data
It's possible that the data you are importing from the CSV file is not in the correct format for the database. For example, the birth date in this example is formatted as month-day-year and MySQL expects the format to be year-month-day.
GoAnywhere can apply formatting to the data as it is read in before it is placed in the database. While on the Read CSV task, click the Add menu and select the Specify Data Options item. Then click Add again and select the Add Column item.
Although the input file in this example contains 4 columns, you are only required to specify columns in which you are overriding the formatting on. On the Basic panel you can specify 4 in the Index attribute to refer to the 4th column. Then on the Type Conversion panel, specify 'DATE' as the Type and enter the Pattern 'MM-dd-yyyy'. This will instruct GoAnywhere that the birth date column is in month-day-year format.

This same process can be applied to other columns that contain numbers or require additional formatting considerations.
SQL Insert
From the Component Library drag the SQL task to the Project Outline after the Read CSV task.
On the SQL task, specify the Database Server from the drop-down list of Resources. If your database is not defined yet, you can click on the Create button next to the field to define the connection information to your database.

The next step is to add an SQL statement, which can be done by clicking on the Add toolbar menu and selecting the Add a Query option.
The first query we are going to specify will delete all existing rows in the database table allowing us to run this process multiple times. We will use the SQL "delete from employees" in the SQL Statement attribute since the table name in this example is "employees".
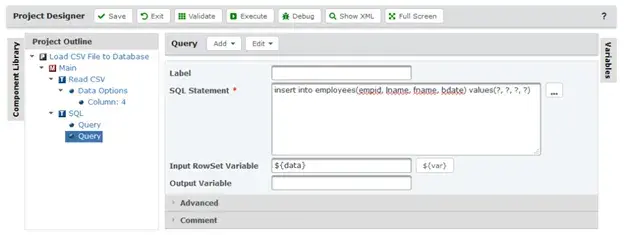
Next, we need to add another Query element to the SQL task. You can do this by right clicking on the SQL task and select the Add a Query option. In the SQL Statement attribute, enter "insert into employees(empid, lname, fname, bdate) values(?, ?, ?, ?)". For each column in your input file you will need to specify a parameter value '?' separated by a comma.
On the Input RowSet Variable attribute, specify the name you used on the Read CSV task (for example, ${data}). When specifying input variables, surround the variable name with the variable syntax ${[varName]}.
Execute Project
Click on the Read CSV component in the Project Outline, and then expand the Control panel.
The Log Level field on the Control panel allows you to specify the level of log messages that are generated. While designing and testing a project, the debug log level provides useful information. Once the Project is running as you intended, you can lower the log level to minimize the amount of logs generated.
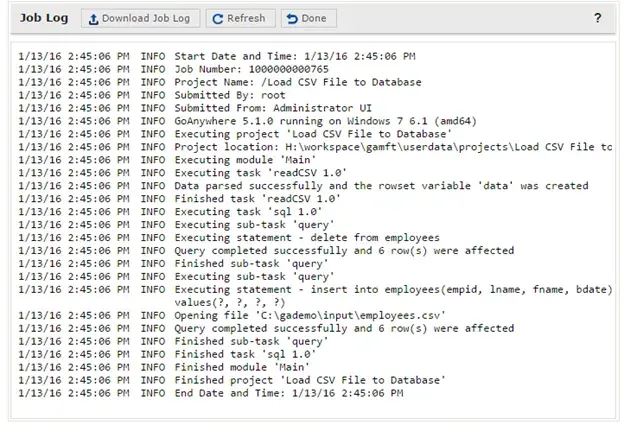
Press the Execute button. The Project will compile, automatically save, and then execute. Once the project has executed, a View Job Log link is displayed. You can review the log, or download it as a text file which can then be emailed to tech support if requested.
View the Job Log and you can see a CSV file was read, the old rows were deleted from the database table, and then new data was inserted into the table.
Click the Done button to return to the Project Designer, and then click Exit to return to the Project Manager.