SFTP uses a combination of asymmetric (public key) cryptology and symmetric cryptology to provide strong encryption and optimal performance. In addition, SFTP is a good protocol to use for transmitting large files since it compresses the data stream prior to encryption.
In this tutorial, you will learn how to configure a Web User to use two-factor authentication (SSH keys and a password) when authenticating with GoAnywhere’s SFTP service.
Not using GoAnywhere MFT yet? Start a free trial and test it out for 30 days.
Importing a Trading Partner’s SSH Public Key
Before a trading partner can authenticate with the SFTP service using an SSH key, a GoAnywhere administrator must import the public portion of that trading partner’s SSH key pair. Follow the instructions below to import an SSH public key and associate that key to a Web User.
- Log in as an Admin User with the Web User Manager role.
- From the main menu bar, select Users, and then click the Web Users link.
- In the Web Users page, click the Action icon next to the Web User, and then click the SSH Keys icon SSH Keys option.
- Import an SSH public key into the Key Vault for a Web User by clicking the Import Public Key button. Once the key is imported, it will become associated to the Web User account.
- Click the Done button to return to the Web User Management page.

Configuring the Web User Authentication Type
Now that the public portion of the SSH key pair has been imported and associated to the Web User, we need to configure the Web User’s authentication type to use a password and SSH key.
- From the Dashboard, point to Security and then click Web User.
- On the Web Users page, click the Edit icon next to the Web User.
- In the Edit Web User page, click the Authentication tab and change the SFTP Authentication Type to Password and Public Key.
- Click the Save button.
When the SFTP client connects to the server, it will look up the client’s public key in the Key Management System based on the Fingerprint. The Web User authenticates if the public key matches the public key sent by the client and the Web User must be in a Domain that has access to the Key Vault where the public key resides.

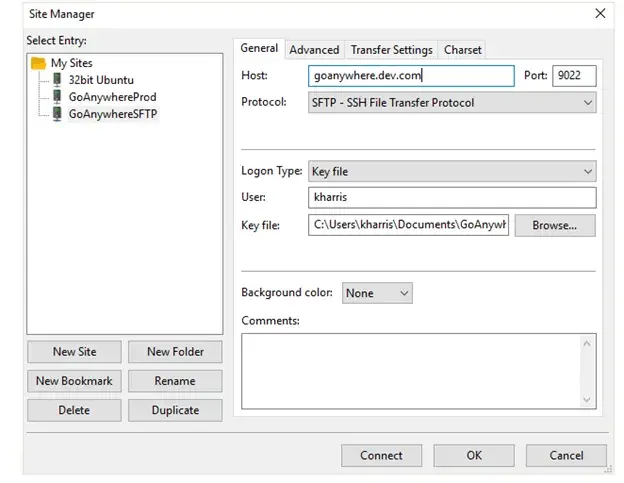
Example SFTP Client Setup
For this example, we’ll use FileZilla as our chosen SFTP client, but the process should be similar with other clients. Follow the steps below to configure an SFTP site connection to GoAnywhere in FileZilla.
- Click on File and select Site manager.
- Click New Site.
- On the Site Manager screen, specify values for the following fields:
- Host – the GoAnywhere domain hosting the SFTP service.
- Port – The port assigned to the SFTP listener.
- Protocol – Select "SFTP – SSH File Transfer Protocol" from the drop-down menu.
- Logon Type – Select "Key file" from the drop-down menu.
- User – Enter the name of the Web User associated with the SSH key.
- Key File – Navigate to the private portion of the SSH key pair.
- Click Connect.
Once connected, you will be prompted to enter the Web User password.