Scheduled Jobs
The Job Scheduler executes Projects at future dates and times. Projects can be configured to execute once, or on a recurring basis. When scheduling projects on a recurring basis, holiday calendars can be used to determine what should happen to a project when the schedule falls on a holiday, such as skipping that run, or executing the day before or day after the holiday.
To schedule a project, click Workflows from the main menu, and then click the Scheduler link. On the Schedules page, click the Add Schedule button.
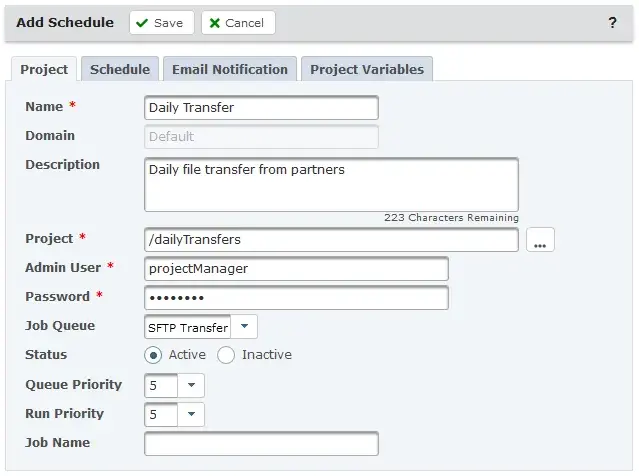
Provide the Schedule a name and optional description. Next, choose the Project that will run, and then add the login credentials of the Admin User that will be used to execute this Job.
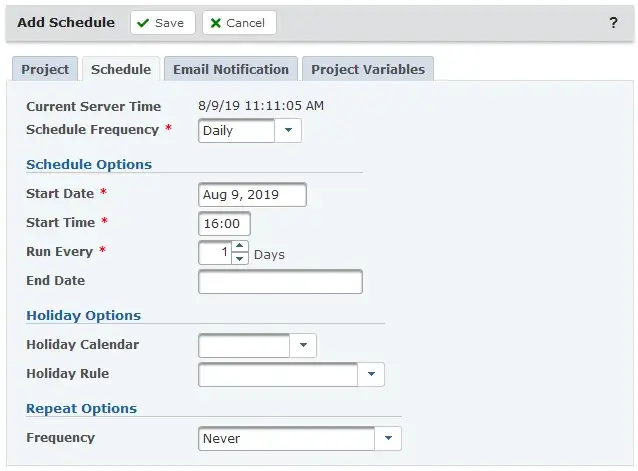
On the Schedule tab, select the frequency that the job will run, the day and time the Schedule will start, and the interval the job will run.
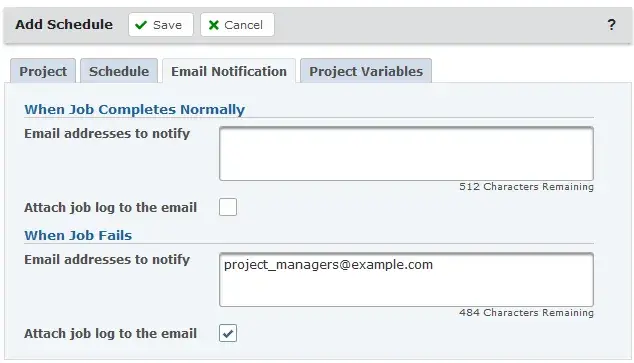
The Email Notification tab is used to alert administrators when scheduled jobs complete successfully or if the scheduled job fails. Optionally, you can be mailed the job log for these events.
The Project Variables tab will identify and display any variables that are being used in the project, and let you override their values at the start of the Project Execution.
Once your Schedule is configured, click the Save button. You will be returned to the Schedule Manager, and your project will automatically run at the designated date and time.
If you want to execute your project immediately, click the Actions button and choose Run Now. From this action button, you can show the execution history, or view the dates and times this schedule will run in the future.
Monitors
The file monitor function in GoAnywhere provides the ability to repeatedly scan for new, changed, or deleted files in a local, network, FTP, FTPS, or SFTP folder. When the monitor finds files that meet the search criteria, then GoAnywhere can call a project to process those files. To create a Monitor, click on Workflows, and then Monitors. From the Monitors page, click Add Monitor.
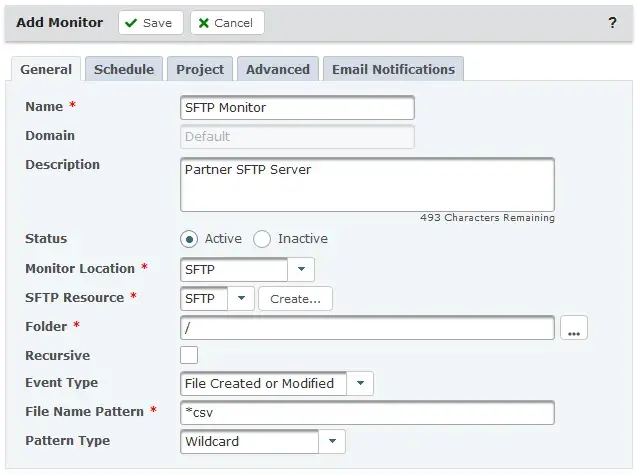
Give the monitor a name, and then an optional description. Select the type of folder that will be monitored, and then specify the path to the folder.
If this is an FTP folder you will need to specify the FTP resource, or create one.
Choose the Recursive option if you want to include the files in the sub-folders of the folder you selected to monitor. Next, choose an event type. I will leave the default, which will have this monitor run a project when a new file is found in my monitored folder. Lastly, you can use wild card or regular expressions to tell the monitor to only execute for specific types of files. In this example, the monitor will run when a CSV file is found, so CSV is added to my file name pattern. Example: *.CSV

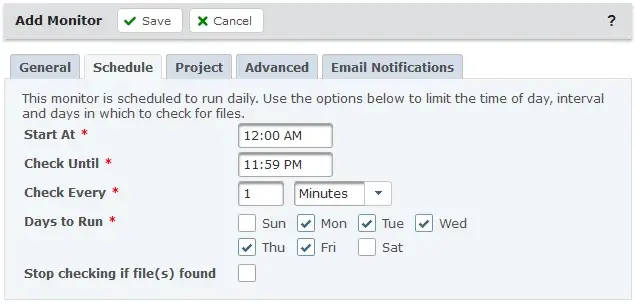
Click the Schedule tab. This is where you can tell the monitor how often it needs to run. For example, if you expect your application to generate a file at the close of business each day, you can start the monitor at 4:30 pm and then run every minute until the file is found.
On the Project tab, choose the Project that will run, and then add the login credentials of the Admin User that will be used to execute this Job. In order for the Project to know which files it should process, the monitor will pass a file list variable to the Project by default. You can add your own variables to pass to the Project as well.
The Advanced tab determines the method GoAnywhere uses to determine if the file is available for processing. For example, you wouldn't want GoAnywhere to process a file that has been partially written to a folder, so you could either lock the file or specify Secondary Snapshot and then a delay. Once GoAnywhere has confirmed that the file isn't being used by another process or is no longer being modified, the project can be executed.
Just like the Scheduler, the Monitor allows you to send email messages with job logs when the Monitor is successful or fails. Click the Save button and return to the Monitor page. When the Monitor is running, you can see the number of times it has run, the last run time, and the number of times the Monitor kicked off a project.
Triggers
Triggers are similar to monitors, but rather than watching folders for files, Triggers monitor for certain Web User events, such as when a file is uploaded or downloaded by a trading partner, or when a login has failed. There are 30 different types of events that can be monitored for. When those events are triggered, GoAnywhere will determine the action to perform. Note that Triggers can perform other actions besides calling Projects.
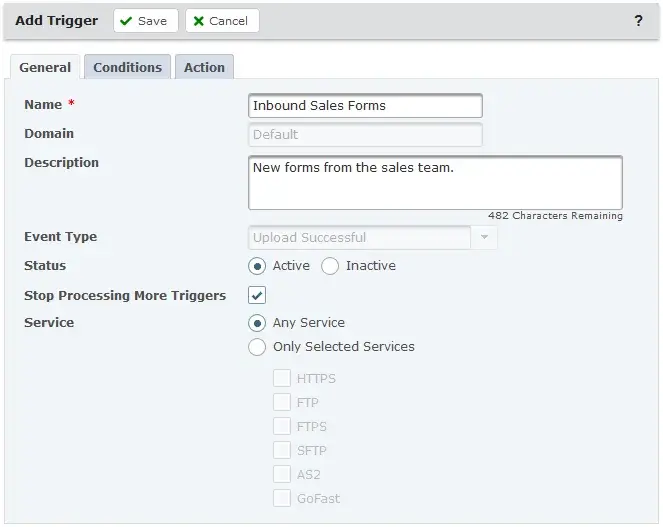
To create a Trigger, select Workflows from the main menu, and then click Triggers. From the Trigger Manager screen, select the Add Trigger button. Select an Event Type from the Event Window. Select the Upload Successful event and then click continue. Give the Trigger a name and an optional description.
Click on the Conditions tab, and then click Add Condition. Conditions help narrow the scope of a Trigger. This event will trigger when a file is uploaded from a specific trading partner.

Select the Attribute drop down and choose event.userName. Set the Expression to Equals, and then set the comparison value to the name of the user. GoAnywhere offers a shortcut where you can select the ellipsis button and a list of Web Users will be displayed.
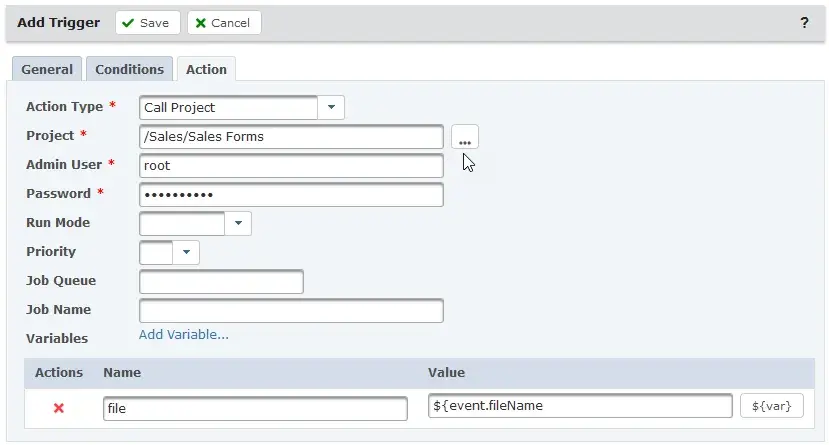
Now select the Action tab. Several different actions can run for the trigger event, and this Trigger will invoke a Project. On the Action tab, select the Call Project action. Select the Project, and then specify the credentials for the Admin User that will be used to run the project. Lastly, pass the name of the file that was uploaded to the Project, so the Project knows where to find the file. Choose Add Variable, give the variable a name, and then click the browse variable button to view a list of variables that can be passed to the project. Chose the event.fileName variable. Click the Save button when finished.
The trigger is displayed on the Trigger Manager screen. When that specific Trading Partner uploads a file, GoAnywhere will pass the name of the file to the Project, and execute the Project.
On a default GoAnywhere installation, all jobs will be executed in the default job queue with the same priority. You can create your own designated Job Queues and priorities by Selecting Workflows, and then choose Job Queues. The Job Queue Manager allows you to add, edit, hold, and release your queues.
Commands and APIs
While you have just learned the three fastest ways to automate Projects using GoAnywhere, Commands and API's are also available that allow external applications to run Projects. These commands and APIs are available at no additional charge and can be installed onto Windows, UNIX, Linux, IBM i (iSeries), HP-UX and Solaris platforms. To get started with commands, please download the GoAnywhere Command installer and documentation from our customer portal at https://my.goanywhere.com or Contact Fortra to enquire about our Java and C# API's.